PROTOTYPE 1
Still unsure of my decision to go with such a complex mechanism, I knew I needed to attempt to make the mechanism work on a small scale. I jumped onto Solidworks and produced this about a day later (this time using the Uni's 3D Printers:

The concept was simple. The key lifts up purple jack which was held in a vertical path by the rectangular register, the tongue with a plectrum would pluck the string and would pivot backwards to return beneath the string, assisted by gravity and a rubber band.


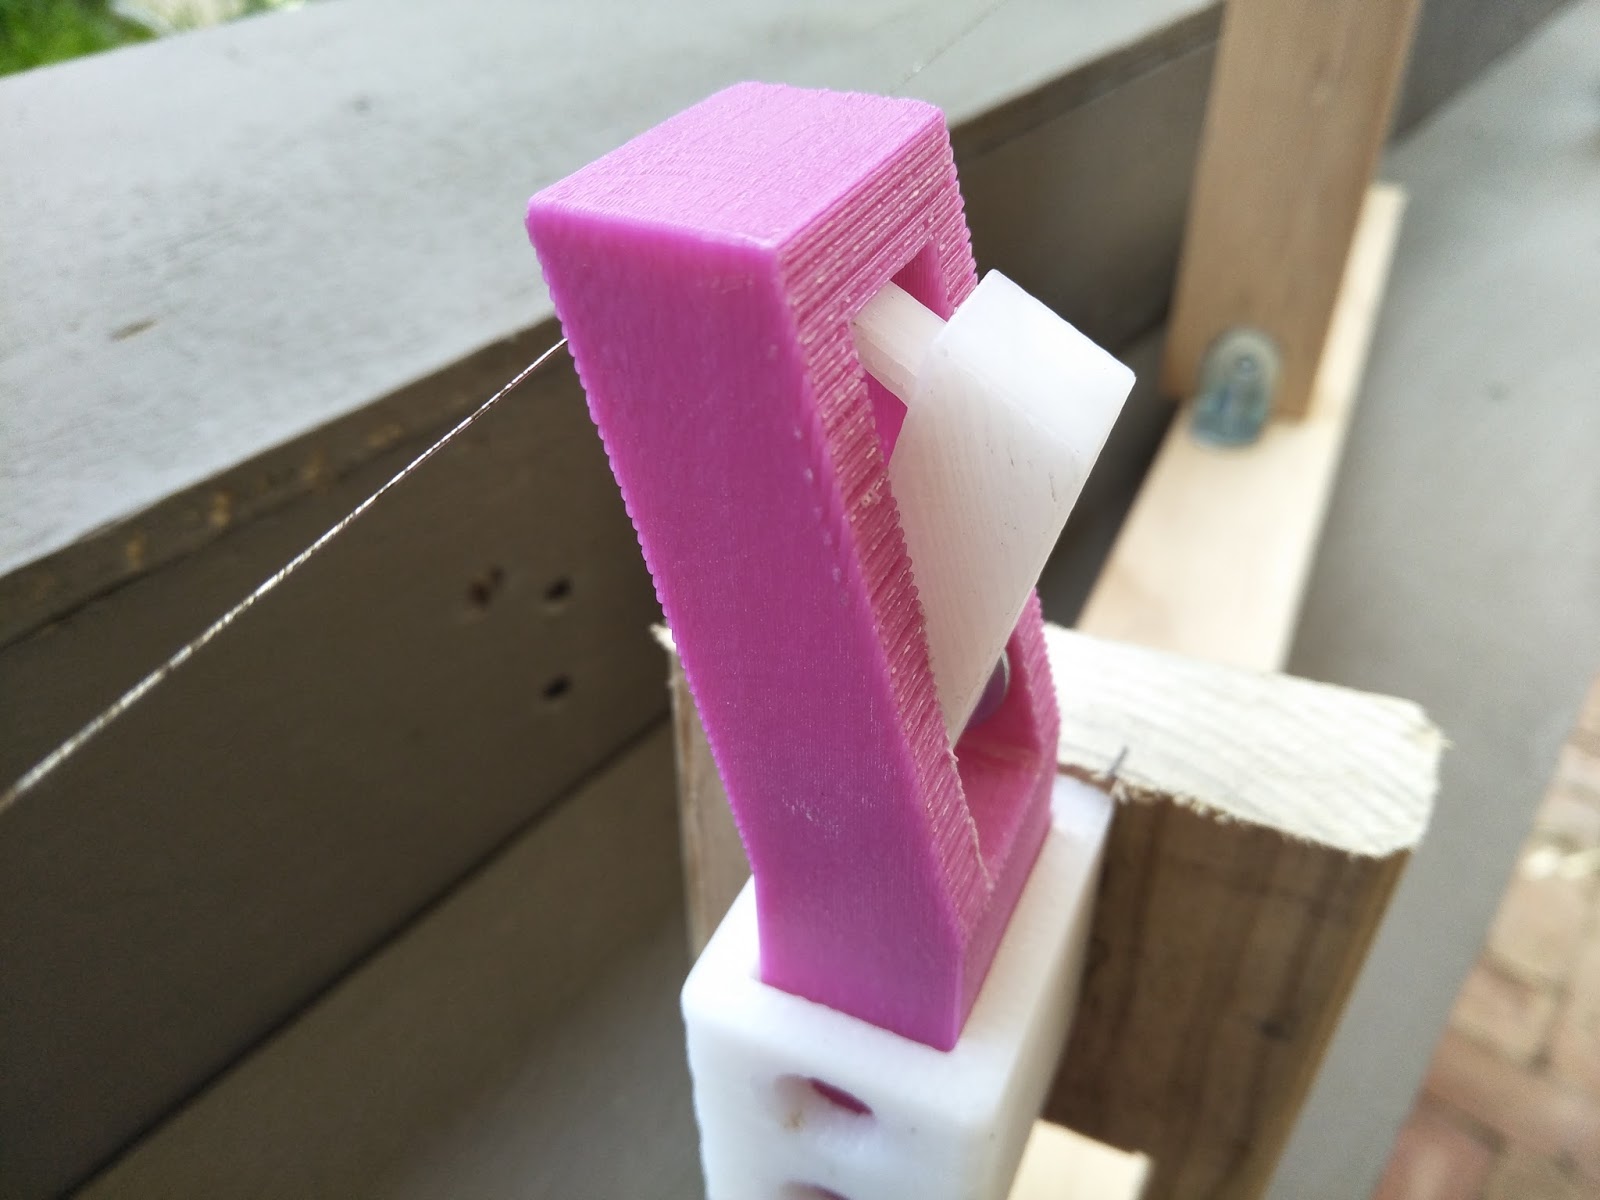
The Jack is angled forwards at the top so the centre of gravity allowed the plectrum to return to its original position. This was my solution to having a spring push it back into place as with a traditional harpsichord.
Full disclosure though, it sucked. The whole thing sucked. The jack would wobble back and forth in the register, the plectrum was too rigid to pluck the string and instead just pushed up against it and also the tension of the string was making the entire assembly buckle, but that's hardly surprising when you look at how the wooden parts were assembled. However, when the plectrum contacted the string exactly right, it would pluck the string. It sent the jack flying upwards and out of the register but it plucked the string! Which made a noise!
I was disgusted at the failure of this prototype and yet it wasn't enough of a failure to allow me to give up on trying again.
PROTOTYPE 2
Go big or go home.
Well I actually stayed at home in my room with the door closed and the curtains shut for a couple of days while conceiving the next prototype. The main areas of focus were derived from the failures of the previous prototype.
- Jack not staying aligned within the register
- Plectrum to rigid to bypass the string
- Assembly too weak to hold the tension of one string
- Tongue not returning to resting position once it returns below the string
Easy enough to fix. I started by modelling the keys, I figured the longer they are on the musicians side of the pivot point meant they'd have more torque meaning the plectrum could pluck the string with ease.
This turned out to be the wrong approach. Having the key longer on the farther side of the pivot point increases the height they would lift the jack. This became important latter on.
The Jacks were modeled on top of the keys and included a groove to fit a rubber band which would help return the tongue to it's resting position. I used an upper and a lower register to align the jacks this time (I got the idea from a real harpsichord) and I included triangular bracing on the areas where the string would be tensioned. All the parts were to be CNC milled out of cheapo MDF with slots to fit together.


I learnt about tolerances on this day. The slots were the same size as the respective fittings and did not want to meet. I took EVERY PIECE to a band saw and widened the gap until the fit together satisfyingly. This was a very important lesson I learnt which I would apply for the rest of the project.


Here are the two registers. Someone forgot to add the cuts for the squares into EnRoute, leaving me to use the workshop's fancying square hole drill press to make them myself. This is not a very precise tool though, it's got to be said. And the jacks still wobbled from side to side a bit. Not to worry though, having an upper and a lower register really did help keep the jack moving in a vertical manner.

A dowel fit tightly into a hole was all that was needed to tension the string. I had to turn the dowel with pliers however, and eventually I destroyed the top of the dowel.


The keys pivoted about upright dowels which went through a slot in the keys. At the back of the key was a length of copper wire used to keep the key from moving left to right keeping it on its desired path.

I noticed that while the triangular braces helped keep the upright supports from bending, they did nothing to stop the 1200mm length of MDF bowing under the tension of ONE STRING! This was concerning but I was told that MDF has no structural integrity and it was a problem that could be easily fixed.


The new jack looked much more like a jack in a real harpsichord. The angled face on the bottom prevented it from rotating anticlockwise while allowing it to rotate as desired. The rubber band wasn't very efficient but it did return the tongue to its resting position for the most part. The plectrum was made from two tips cut from zip-ties and glued together. And thus my adventure to find the perfect plectrum began! the zip-tie plectrum was flexible enough to bypass the string but rigid enough to make a noise as it did so.
All assembled, the contraption sound a little like this. My friend came and looked at my device and suggested part of the problem with the sound was to do with the string coming to an end over a flat surface:


My friend told me that the length of string that was resting over the flat parts of the wood were still vibrating, but slapping against the wood beneath it, creating an awful sound. Again, this would be an easy fix.
PROTOTYPE 3
This is more like prototype 2.5 because it consists of many of the same parts. Basically, I just added and changed some things on the existing CAD model so I could take apart Prototype 2 and improve it with a minimal usage of new materials. I spent hours upon hours setting up the illustrator file to send in for CNC routing but when Shane had a look at it, he wouldn't allow it to go through the CNC machine. He said the parts were too close together and the CNC machine wouldn't like that. He did offer to laser cut them however. The drawback here was that i needed 12mm parts and the laser cutter only does up to 6mm. The solution? Cut every single part out twice and glue them together.
Great.
I wish I had photos of this mundane process. Actually, no I don't. Data space is precious these days.
This was the enhanced prototype:


 This worked way better than the 3D printed part and the zip-tie nightmare. Andrew suggested looking into acetal for the final model, but HIPs was working as i needed it to for now.
He also suggested that I make the final model open, so all the mechanisms could be seen. This was a game changer. Why didn't I think of it before? A box is just a box, the hours of work and fruits of my trial and error should be on display for all the world to see. Not hidden behind some box. It was at this point I changed my two materials to laser cut acrylic, and CNC'd corian. I had heard corian was cheap and very strong, which is what I needed to hold the amount of tension I wanted.
After Prototype 3 was finished and working, I was filled with new found confidence in my decision to make a harpsichord... delicious, evil confidence. The death of any strict study regime. Despite a LOT of procrastination I finally started the CAD model for the real deal...
Great.
I wish I had photos of this mundane process. Actually, no I don't. Data space is precious these days.
This was the enhanced prototype:


Now, the most notable difference is what the hell is going on in the middle of this thing. Well, inspired by the Harp's sharping levers i mentioned earlier, I thought of a way to increased the amount of notes each string could play. It turns out, that if you halve the length of a string and keep the tension the same, it goes up by exactly one octave. If you halve that again, two octaves. New keys, or paddles, were added to the right side of the prototype which each lifted a new assembly which pushed frets against the strings at the correct points.

Having these new keys close to the front was important for the musician to be able to reach them. This is why they were shaped in this way. The large rectangular patterned worked very well to pivot and lift up the frets that had press the strings at the far end. This was ultimately redundant because it acted as the end of the total length and when it wasn't pressed, the end was about 20mm further back... I only really needed this mechanism twice, not three times, to have the same range of 3 octaves.


This fret system actually worked extraordinarily well. There was little to no wobble of the moving assemblies and they actually put the pitch up one octave perfectly. I was excessively thrilled about this because I came up with the idea on my lonesome. Admittedly, there's no such thing as a purely original idea and every thought we have is derived from something else, but I still can't help but feel proud of myself for this one. Also, the prototype had started to look insanely cool. I actually like the blackened edges of the laser cut MDF.


This time I tried making the plectrums out of 1mm HIPS leftover from my Iron project (throwback)

He also suggested that I make the final model open, so all the mechanisms could be seen. This was a game changer. Why didn't I think of it before? A box is just a box, the hours of work and fruits of my trial and error should be on display for all the world to see. Not hidden behind some box. It was at this point I changed my two materials to laser cut acrylic, and CNC'd corian. I had heard corian was cheap and very strong, which is what I needed to hold the amount of tension I wanted.
After Prototype 3 was finished and working, I was filled with new found confidence in my decision to make a harpsichord... delicious, evil confidence. The death of any strict study regime. Despite a LOT of procrastination I finally started the CAD model for the real deal...
No comments:
Post a Comment